HP Laser Printers - Print Driver Settings Guide (Windows)
HP Laser Printers - Print Driver Settings Guide (Windows)
This document is for the HP Laser 100, 150, 1000, MFP 130, and 170
printer series.
When you set up your HP Laser printer on your computer with the
recommended HP software, a print driver installs that provides you access
to the features your printer supports. The print driver lets you change
color, paper, quality settings and more when printing documents, photos,
and webpages.
Open the HP Laser print driver, and then read the guides in this document
on how to find and change the settings.
Opening the print settings window
Launch the HP Laser print driver window from common Windows applications
and learn how to navigate the different tabs and menus.
-
Open the document or photo on your computer, click File or the menu icon, and then click Print.A Print or Print Pictures window or pane opens with general print job settings, including the menu to select the printer you want to print to.
-
Open Document Properties or Printing Preferences from the main print window or pane to access the HP Laser print driver settings. The button or link name varies depending on the app you are printing from.
-
Microsoft Word: Click Printer Properties
-
Paint and WordPad: Click Preferences
-
Windows Photo Viewer: Click Options... in the lower right corner of the screen, and then click Printer Properties... in the Print Settings window
-
Adobe PDF Reader: Click Properties
-
-
To view the different settings, click the tabs along the top of the window.
-
Click the Favorites tab to use shortcuts that have essential settings already selected for common print job types.
Color and black print settings
The HP Laser driver can be used to control how the printer interprets
colors. For best results, edit the photo or document in the application
you created it in before printing to improve colors, brightness, contrast
and any other appearance settings.
|
Settings and options
|
Location
|
|
Selecting color or black:
|
Document Type, Color Mode and Font / Text menus on
the Graphics tab
|
|
Color management options: Define the range of
colors printed based on industry color standards and the
application you are printing from. The print driver translates
colors from current color settings to the selected option.
|
Balance menu on
the Matching tab, from the Color Mode menu Advanced button, on
the Graphics tab
|
|
Advanced color settings: Adjust saturation,
brightness, and tone, or change individual color levels.
|
Advanced Color Settings on
the Levels tab, from the Color Mode menu Advanced button, on
the Graphics tab
|
Paper type, size, and input tray settings
Paper size, type, and tray settings help ensure the printer properly
handles and scales the print job to the paper.
|
Setting
|
Location
|
|
Paper size: Select the Original
Size for your print job, and then select the Output
Size for the paper size you loaded in the printer, such
as Letter or Legal. Check your printer specifications for
supported paper sizes.
|
Paper Options menu on
the Paper tab
|
|
Type: Set the paper type you are using, such
as plain, glossy, or recycled so the printer properly handles
and prints on the paper.
|
Print quality and improvement settings
Change print quality settings to suit your print job. Text-only documents
typically require normal or lower quality settings, while photos for
framing benefit from higher quality settings. Layout and formatting menus
display for some Favorites, if available.
|
Setting
|
Location
|
|
Quality: Measured in print resolution dots
per inch (DPI). Higher DPI produces clearer and more detailed
prints, but slows print speed and may use more ink.
|
Advanced on the Document Type menu on
the Graphics tab
|
|
Economode: Lowest DPI typically used when ink
cartridge levels are low or when high quality prints are not
needed
|
Economode menu on
the Graphics tab
|
|
Printing in color or grayscale: The following
settings might be available, depending on the printer model:
|
Select Color or Grayscale on
the Graphics tab
|
Layout and formatting settings
Change how documents or photos are formatted and laid out on the paper,
including orientation, adding borders, scaling to a specific size paper,
and printing multiple pages on single sheet.
|
Setting
|
Location
|
|
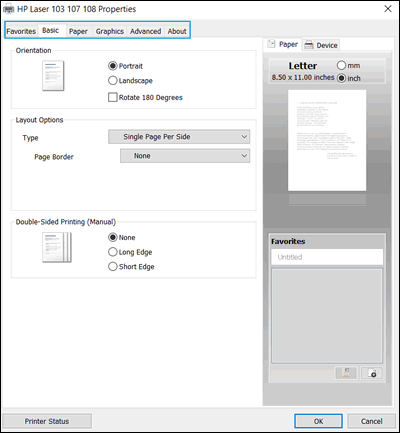
Portrait or landscape orientation: Select
Portrait for vertical prints or Landscape for horizontal
prints.
|
Orientation menu on
the Basic tab
|
|
Add or remove a border: Add a solid line,
dashed line, or other border to your print.
|
Layout Options menu on
the Basic tab
|
|
Print on both sides of the page (duplexing):
Depending on your printer model, you can set up the print job
to print on both sides of the pages, and manually flip the
pages.
Go to Printing on Both Sides of the Paper (Windows)for
detailed steps on how to load and flip the paper for your
printer type.
|
Double-Sided Printing (Manual) menu on
the Basic tab
|
|
Layout Options: Select the layout option for
your print.
|
Layout Options menu on
the Basic tab
|
|
Print order: Print pages from front to back
or back to front.
|
Output Options menu on
the Advanced tab
|
|
Scale or resize the printout: Print to fit on
different paper sizes, scale to fit a selected paper size, or
change the percentage of the original size that prints.
|
Paper Options menu on
the Paper tab
|
|
Watermarks: Prints a watermark on every page
of the document or on the first page only, if selected.
Select Edit... in the drop-down
menu for formatting options.
|
Output Options menu on
the Advanced tab
|
Create a print settings shortcut (favorite)
Create a new favorite (print settings shortcut) in Properties.
-
In the app you created the document in, click File or the menu icon
 (WordPad), and then click Print to open general
print settings.
(WordPad), and then click Print to open general
print settings.
-
Click Printer Properties, Properties, or Preferences.
-
Change any of the settings.The settings you select display in the Favorites window on the lower-right of the Basic, Paper, Graphics, or Advanced tab.

-
In the Favorites section, click the Add icon
 .
.
-
Type a name and description, select an icon, and then click OK to save the new favorite.The favorite is added to the Favorites tab.
Set default settings for all print jobs
Set the default settings for all print jobs in Windows.
-
Search Windows for control panel, click Control Panel in the search results, and then click Devices and Printers.
-
Right-click the icon for your printer, and then click Printer Properties.
-
Click the Advanced tab, and then click Printing Defaults.
-
Change any settings you want as defaults, and then click OK.
https://support.hp.com/


Comments
Post a Comment