HP Laser Printers - Creating Custom Paper Sizes
HP Laser Printers - Creating Custom Paper Sizes
This document is for the HP Laser 100, 150, 1000, MFP 130, 170, and
1000 Printer Series.
Print to any size paper within the minimum and maximum printing dimensions
supported by your printer.
CAUTION:To avoid print quality problems and other issues, make sure your custom size does not exceed the actual size of your paper.
Create custom paper sizes on a Windows computer
Create a custom paper size directly from the printer properties menu.
-
Load the custom-size paper into the paper input tray.
-
Open the item you want to print.
-
Click File, and then click Print.
-
In the Print window, click Preferences, Properties, or Printer Properties.
-
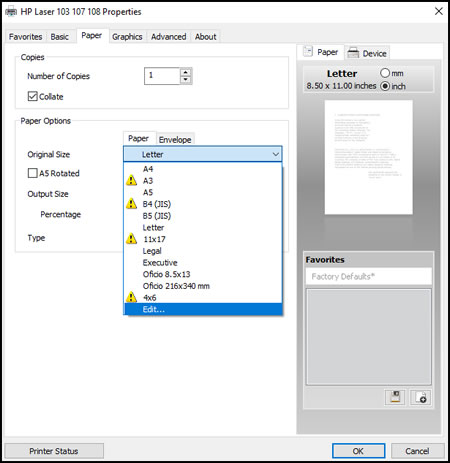
Click the Paper tab, and then select Edit from the Original Size menu.
-
Type a name for your custom paper size, adjust the width and height to your preference, and then click Add.
NOTE:
To change the dimensions to metric, click mm.Your custom paper size is now saved. You can select this custom paper size in the future and edit it if needed.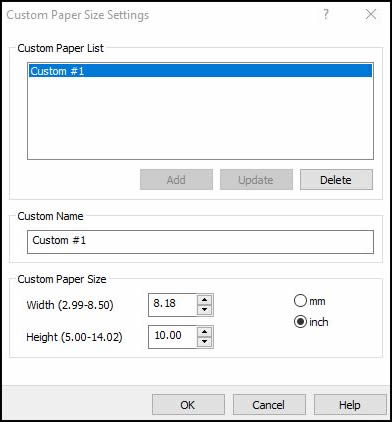
-
Click OK.
-
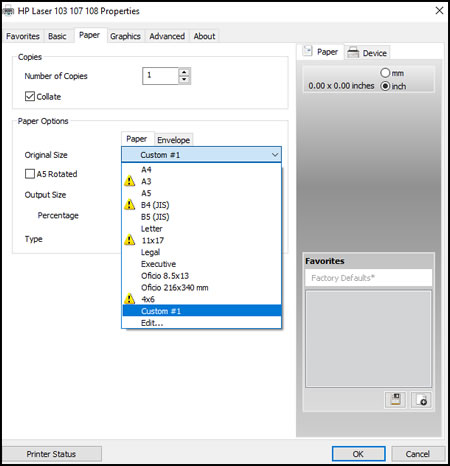
Click the Original Size drop-down menu, and then select your custom paper size.
-
Make any other preference changes if necessary, and then click OK.
NOTE:
Supported paper sizes vary by printer. You cannot select a larger or smaller size than the printer supports. -
Click OK or Print to print the document.
Create custom paper sizes on a Mac
Create a custom paper size using the Page Setup option on the File menu of
your application, and then select the new custom size for the print job.

VIDEO
How to create custom paper sizes when printing from the page
setup menu in macOS
Learn how to create custom paper sizes when printing from
the page setup menu in macOS.
-
Load the custom-size paper into the paper input tray.
-
Open the item you want to print.
-
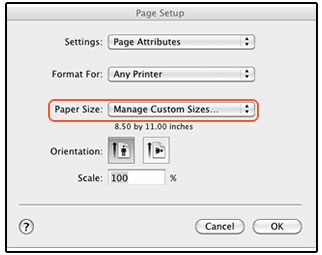
Click File, and then select Page Setup.
-
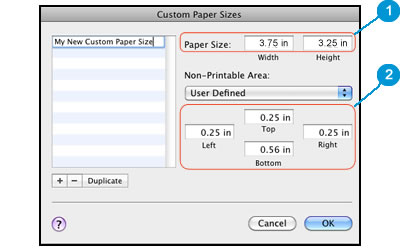
In Paper Size, select Manage Custom Sizes.The Custom Paper Sizes window displays.
-
In the Custom Paper Sizes window, click the plus sign
 to create a new paper size, double-click the default
untitled name, and then type a new name for the custom paper size.
to create a new paper size, double-click the default
untitled name, and then type a new name for the custom paper size.
NOTE:
Use a different, unique name for the new custom paper size. Do not use an existing paper size name for any new custom paper size names because it overrides the existing preset. For example, if a custom paper size is named A4, then the existing A4 paper size is no longer available as a choice.
-
In the Paper Size section, type the dimensions of the custom paper in the Width and Height text boxes, and then set the margins, ifdesired.
-
Paper Size
-
Margins
-
-
Click OK.
-
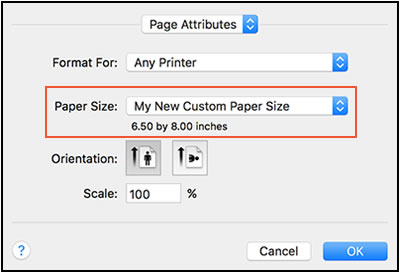
In the Page Setup window, select the new custom paper size, and then click OK.
-
Click File, and then select Print.
-
Change print settings, if desired, and then click OK or Print to print the document.
https://support.hp.com/


Comments
Post a Comment