HP Laser MFP 130, 1000 Printers - Paper Jam Error
HP Laser MFP 130, 1000 Printers - Paper Jam Error
This document is for HP Laser MFP 131a, 133pn, 135a, 135ag, 135r, 135w,
135wg, 136a, 136nw, 136w, 137fnw, 137fwg, 138fnw, 138p, 138pn, 138pnw,
1136w, 1139a, 1188a, 1188w, 1188nw, and 1188pnw printers.
During printing, the printer stops feeding pages, the Status
light blinks, and one of the following messages might display on the
printer control panel:
-
Document jam
-
Paper Jam in Tray
-
Paper Jam inside machine
Step 1: Look for jammed paper
Paper jams can occur in multiple areas of the printer. If you cannot find
the paper jam in one area, continue to the instructions for the next area
until the jam is located.
Clear jammed paper from the input tray
Remove any jammed paper that is accessible from the input tray.
-
Remove any paper from the input tray.
-
Use both hands to remove any jammed paper from the input tray.
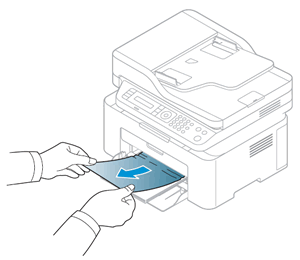
-
Lift the scanner assembly, and then close it to clear the error message.
If the error persists, check for jammed paper in another area of the
printer.
Clear jammed paper from the fuser area
Remove any jammed paper that is accessible from the fuser area.
-
Turn off the printer, and then unplug the power cord from the electrical outlet.
WARNING:
You must disconnect the power cord before reaching inside the printer to avoid risk of injuries or electric shock. -
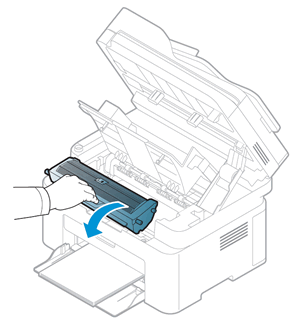
Lift the scanner assembly, and then lift the toner cartridge access door.
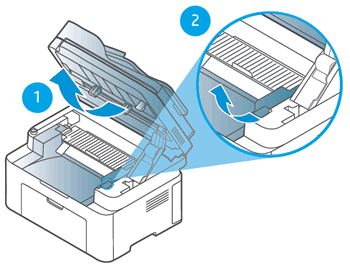
-
Lifting the scanner assembly
-
Lifting the toner cartridge access door
-
-
Lift to open the fuser dummy cover.
WARNING:
The fuser area might be hot. Use caution when removing paper from the printer.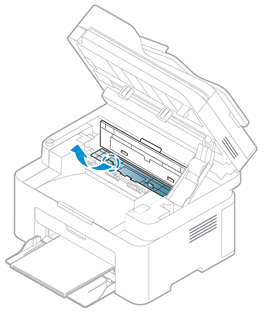
-
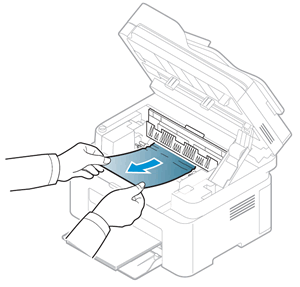
Use both hands to remove any jammed paper from the fuser area.
-
Close the fuser dummy cover, and then close the paper jam cover.
-
Close the scanner assembly.
-
Reconnect the power cord to the rear of the printer, and then turn on the printer.
If the error persists, check for jammed paper in another area of the
printer.
Clear jammed paper from the toner cartridge access area
Remove any jammed paper that is accessible from the toner cartridge
access area.
-
Turn off the printer, and then unplug the power cord from the electrical outlet.
WARNING:
You must disconnect the power cord before reaching inside the printer to avoid risk of injuries or electric shock. -
Lift the scanner assembly, and then lift the toner cartridge access door.
-
Lifting the scanner assembly
-
Lifting the toner cartridge access door
-
-
Grasp the handle on the toner cartridge, and then pull the toner cartridge out to remove it.
-
Use both hands to remove any jammed paper from the toner cartridge access area.

-
Reinsert the toner cartridge, and then close the toner access door.
-
Close the scanner assembly.
-
Reconnect the power cord to the rear of the printer, and then turn on the printer.
If the error persists, check for jammed paper in another area of the
printer.
Clear jammed paper from the ADF (HP Laser MFP 133, 137, 138, 1188pnw printers only)
Remove any jammed paper from the automatic document feeder (ADF).
-
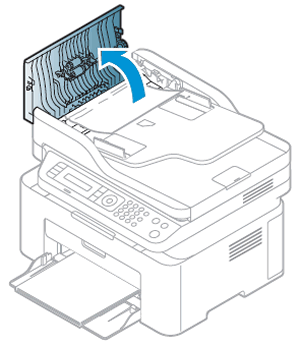
Lift the ADF cover.
-
Use both hands to remove any jammed paper inside the ADF, and then close the ADF cover.

-
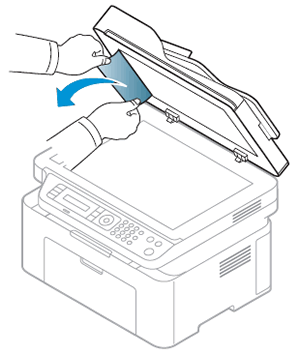
Open the scanner lid, and then use both hands to remove any jammed paper behind the plastic backing.
-
Close the scanner lid, and then use both hands to remove any jammed paper from the document feeder output tray.

If the error persists, continue to the next step.
Step 2: Reset the printer
Sometimes a paper jam error persists even though there is no jammed paper
(false paper jam). Reset the printer, which might clear a false paper jam
error.
-
With the printer turned on, disconnect the power cord from the printer.
-
Unplug the power cord from the power source.
-
Wait 60 seconds.
-
Reconnect the power cord to a wall outlet and to the printer.
NOTE:
HP recommends plugging the printer directly into a wall outlet.
Step 3: Try to print, scan, or copy again
Send the print, scan, or copy job again to make sure the hardware
functions correctly. If the problem persists, continue to the next step.
Step 4: Service the printer
Service or replace your HP product if the issue persists after completing
all the preceding steps.
Go to Contact HP Customer Support to schedule a product repair
or replacement. If you are in Asia Pacific, you will be directed to a
local service center in your area.
https://support.hp.com/


Comments
Post a Comment